Dell
™
Axim
™
X50
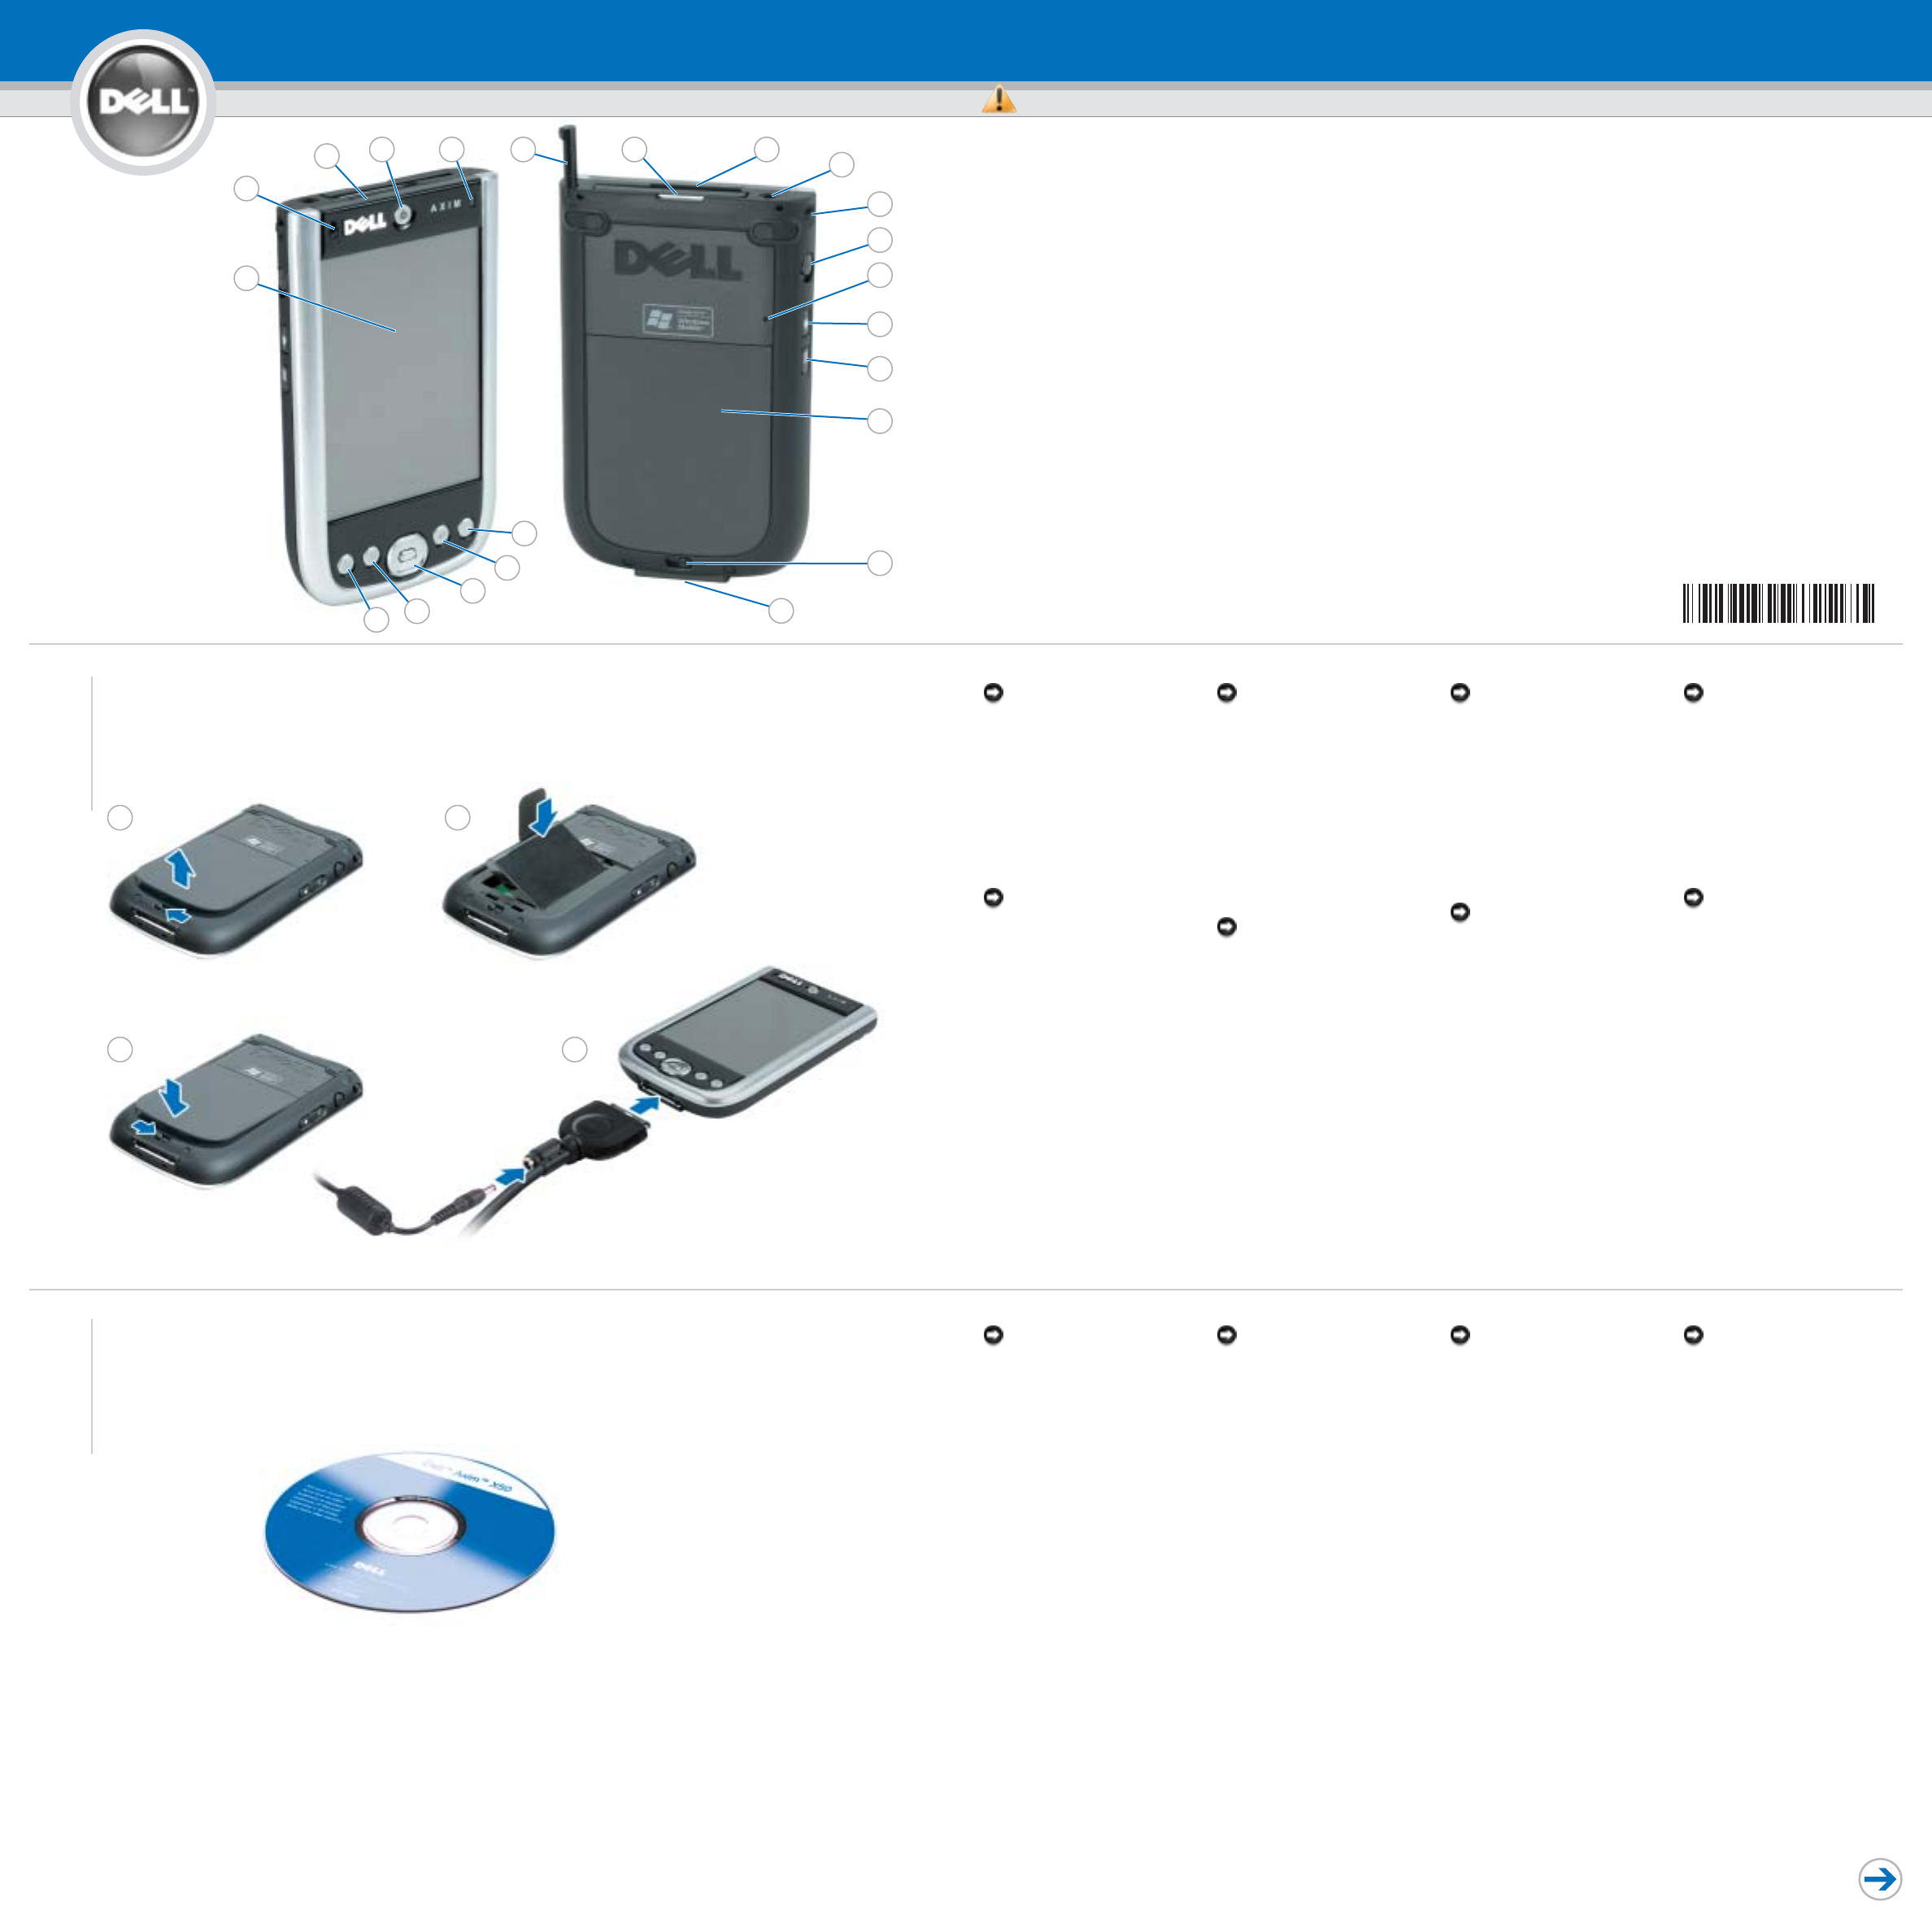
Features
Merkmale | Funzioni |
Właściwości
CAUTION:
Before you set up and operate your Dell
™
device, read and follow the safety
instructions in your device
Owner’s
Manual.
1. touch screen
2. microphone
3. infrared sensor
4. power button
5. wireless light
6. reset stylus (extended)
7. CompactFlash card slot
8. Secure Digital memory card slot
9. audio connector
10. lanyard hook
11. lock button
12. reset button
13. wireless on/off button
14. record button
15. battery cover
16. battery cover lock
17. cradle/sync cable connector
18. Home button
19. Inbox button
20. navigator button
21. Contacts button
22. Calendar button
VORSICHT:
Bevor Sie Ihr Dell
™
-Geräte aufstellen und
einrichten, lesen Sie unbedingt die
Sicherheitshinweise im
Benutzerhandbuch
.
1. Touchscreen
2. Mikrofon
3. Infrarotsensor
4. Netzschalter
5. Wireless-Anzeige
6. Reset Stift (erweitert)
7. CompactFlash-Kartensteckplatz
8. Secure-Digital-
Speicherkartensteckplatz
9. Audioanschluss
10. Bändselhaken
11. Verriegelung
12. Reset
13. Wireless EIN/AUS
14. Aufnahmetaste
15. Akkuabdeckung
16. Akkuabdeckungverriegelung
17. Anschluss für Dockingstation-
/Synchronisationskabel
18. Home
19. Posteingang
20. Navigation
21. Kontakte
22. Kalender
ATTENZIONE:
Prima di installare ed utilizzare il palmare
Dell
™
, leggere e seguire le istruzioni di
sicurezza nel
Manuale del proprietario
del palmare.
1. schermo a sfioramento
2. microfono
3. sensore infrarossi
4. pulsante di alimentazione
5. indicatore senza fili
6. stilo di reimpostazione (estesa)
7. slot della scheda CompactFlash
8. slot della scheda di memoria Secure
Digital
9. connettore audio
10. gancetto
11. pulsante di blocco
12. pulsante di reimpostazione
13. pulsante di attivazione/disattivazione
funzionalità senza fili
14. pulsante di registrazione
15. coperchio della batteria
16. chiusura del coperchio della batteria
17. connettore per supporto da
tavolo/cavo di sincronizzazione
18. pulsante Pagina iniziale
19. pulsante Posta in arrivo
20. pulsante di navigazione
21. pulsante Contatti
22. pulsante Calendario
PRZESTROGA:
Przed skonfigurowaniem i uruchomieniem
urządzenia firmy Dell
™
należy przeczytać i
zastosować się do instrukcji dotyczących
bezpieczeństwa w Instrukcji użytkownika
urządzenia.
1.
ekran dotykowy
2.
mikrofon
3.
czujnik podczerwieni
4.
przycisk zasilania
5.
lampka połączenia bezprzewodowego
6.
rysik resetu (wysunięty)
7.
gniazdo karty CompactFlash
8.
gniazdo karty pamięci Secure Digital
9.
złącze audio
10.
zaczep paska
11.
przycisk blokowania
12.
przycisk resetowania
13.
przełącznik łączności bezprzewodowej
14.
przycisk zapisu dźwięku
15.
pokrywa akumulatora
16.
blokada pokrywy akumulatora
17.
złącze (dolna część) stacji
bazowej/kabla synchronizacyjnego
18.
przycisk strony głównej
19.
przycisk skrzynki odbiorczej
20.
przycisk nawigacji
21.
przycisk kontaktów
22.
przycisk kalendarza
www.dell.com | support.dell.com
NOTICE: Do not connect your device
to the computer until the instructions
prompt you to do so.
1. Remove the battery cover.
2. Install the battery.
3. Replace the battery cover and lock it.
4. The device will turn on immediately.
Turn off the device by pressing the
power button.
5. Connect the AC adapter and charge
the device for at least 8 hours for the
first charge.
NOTICE: To avoid damaging the
connector, perform the following
step before pulling the connector out
of the device.
6. After the battery is charged, press the
two buttons on the sides of the
connector to release the self-lock
structure and remove the AC adapter.
7. Press the power button and follow the
instructions on the screen.
HINWEIS: Schließen Sie Ihr Gerät
erst dann an den Computer an, wenn
Sie dazu aufgefordert werden.
1. Entfernen Sie die Abdeckung des
Akkufachs.
2. Installieren Sie den Akku.
3. Bringen Sie die Akkuabdeckung wieder
an und verriegeln Sie sie.
4. Das Gerät wird sich daraufhin sofort
einschalten. Schalten Sie das Gerät
durch Drücken des Netzschalters aus.
5. Schliessen Sie den Netzadapter an und
laden Sie das Gerät beim ersten Mal
mindestens 8 Stunden lang.
HINWEIS: Bevor Sie den Anschluss
aus dem Gerät ziehen, führen Sie
den nächsten Schritt durch, um
Schäden zu vermeiden.
6. Nachdem der Akku geladen ist,
drücken Sie die zwei Schalter an den
Seiten des Anschlusses, um die
Selbstverriegelung zu lösen und den
Netzadapter zu entfernen.
7. Betätigen Sie den Netzschalter und
folgen Sie anschließend den
Anweisungen auf dem Bildschirm.
AVVISO: Non collegare il palmare al
computer finché le istruzioni non
richiedano di farlo.
1. Rimuovere il coperchio della batteria.
2. Installare la batteria.
3. Ricollocare il coperchio della batteria e
chiuderlo.
4. Il palmare si accende immediatamente.
Spegnere il palmare premendo sul
pulsante di alimentazione.
5. Collegare l'adattatore c.a. e caricare il
palmare per almeno 8 ore per la prima
ricarica.
AVVISO: Per evitare danni al
connettore, eseguire la procedura
seguente prima di estrarre il
connettore dal palmare.
6. Dopo che la batteria si è ricaricata,
premere i due pulsanti sui lati del
connettore per sbloccare la struttura di
bloccaggio automatico e rimuovere
l'adattatore c.a..
7. Premere il pulsante di alimentazione e
seguire le istruzioni visualizzate.
OSTRZEŻENIE: Urządzenia nie należy
podłączać do komputera, dopóki nie
pojawi się odpowiednie polecenie.
1.
Zdejmij pokrywę akumulatora.
2.
Zainstaluj akumulator.
3.
Załóż pokrywę akumulatora i zablokuj ją.
4.
Urządzenie natychmiast się włączy.
Wyłącz urządzenie naciskając przycisk
zasilania.
5.
Podłącz zasilacz prądu zmiennego i za
pierwszym razem ładuj urządzenie przez
co najmniej 8 godzin.
OSTRZEŻENIE: Aby uniknąć uszkodzenia
złącza, przed wyjęciem złącza z
urządzenia należy wykonać następującą
czynność.
6.
Po naładowaniu akumulatora naciśnij dwa
przyciski z boków złącza i zwolnij
automatyczną blokadę, a następnie
wyjmij złącze zasilacza prądu zmiennego.
7.
Naciśnij przycisk zasilania i postępuj
zgodnie z poleceniami na ekranie.
NOTICE: Do not connect your device
to the computer until the instructions
prompt you to do so.
After the battery is fully charged, press
the power button and follow the on-
screen instructions to complete the initial
setup. Then use ActiveSync to
synchronize the data on your device with
the data on your computer.
1. Insert the
Dell Companion
CD.
2. Click Getting Started and click
Start Here.
3. Install and configure Microsoft Outlook
only if it is not already installed and
configured on your computer and you
do not have a more recent version.
4. Click Install ActiveSync, click Install,
and follow the instructions on the
screen.
5. When prompted, use the instructions
on the reverse side of this setup guide
to connect your device to the
computer.
See
ActiveSync Help
on your computer
for more information.
HINWEIS: Schließen Sie Ihr Gerät
erst dann an den Computer an, wenn
Sie dazu aufgefordert werden.
Nachdem der Akku völlig geladen ist,
betätigen Sie den Netzschalter und
folgen Sie den Anweisungen auf dem
Bildschirm, um das ursprüngliche Setup
abzuschließen. Daraufhin verwenden Sie
Microsoft ActiveSync, um die Daten auf
Ihrem Gerät mit den Daten auf Ihrem
Computer zu synchronisieren.
1. Legen Sie die
Dell Companion
CD ein.
2. Klicken Sie auf Zum Einstieg und dann
auf Starten Sie hier.
3. Installieren und konfigurieren Sie
Microsoft Outlook nur dann, wenn es
nicht schon auf Ihrem Computer
installiert oder konfiguriert ist und Sie
keine neuere Version haben.
4. Klicken Sie auf Install ActiveSync
(ActiveSync installieren), auf Install
(Installieren), und folgen Sie dann den
Anleitungen auf dem Bildschirm.
5. Falls aufgefordert, folgen Sie den
Anweisungen auf der Rückseite der
Setup-Hilfe, um Ihr Gerät an Ihrem
Computer anzuschließen.
Weitere Informationen erhalten Sie in der
Online-Hilfe zu
ActiveSync
auf Ihrem
Computer.
AVVISO: Non collegare il palmare al
computer finché le istruzioni non
richiedano di farlo.
Dopo che la batteria si è ricaricata
completamente, premere il pulsante di
alimentazione e seguire le istruzioni
visualizzate per completare l'installazione
iniziale. Quindi, utilizzare ActiveSync per
sincronizzare i dati nel palmare con quelli
del computer.
1. Inserire il CD
Dell Companion
.
2. Fare clic su Procedure preliminari e su
Procedure preliminari.
3. Installare e configurare Microsoft
Outlook solo se non è già installato e
configurato nel computer e se non si
dispone di una versione più recente.
4. Fare clic su Install ActiveSync (Installa
ActiveSync), poi su Install (Installa) e
seguire le istruzioni visualizzate.
5. Quando richiesto, utilizzare le istruzioni
sul lato opposto della guida di
installazione per collegare il palmare al
computer.
Per maggiori informazioni, consultare la
Guida in linea di ActiveSync
nel
computer.
OSTRZEŻENIE: Urządzenia nie należy
podłączać do komputera, dopóki nie
pojawi się odpowiednie polecenie.
Po całkowitym naładowaniu akumulatora
naciśnij przycisk zasilania i postępuj zgodnie
z poleceniami na ekranie, aby zakończyć
początkową konfigurację. Następnie użyj
aplikacji ActiveSync, aby zsynchronizować
informacje pomiędzy komputerem a
urządzeniem.
1.
Włóż dysk CD Dell Companion.
2.
Kliknij opcje Getting Started (Szybki
start) i Start Here (Zacznij tutaj).
3.
Zainstaluj i skonfiguruj program Microsoft
Outlook, o ile nie został on już
zainstalowany i skonfigurowany na
komputerze i nie masz nowszej wersji.
4.
Kliknij opcję Install ActiveSync
(Zainstaluj program ActiveSync), kliknij
polecenie Install (Zainstaluj), a następnie
postępuj zgodnie z poleceniami na
ekranie.
5.
Po wyświetleniu monitu skorzystaj z
instrukcji umieszczonej na odwrotnej
stronie niniejszej instrukcji konfiguracji,
aby podłączyć urządzenie do komputera.
Więcej informacji na ten temat można
znaleźć w systemie pomocy programu
ActiveSync na komputerze.


 (178 pages)


 (2 pages)

 (2 pages)
 Manymanuals.com
 Manymanuals.de
 Manymanuals.fr
 Manymanuals.it
 Manymanuals.pl
 Manymanuals.cz
 Manymanuals.es
 Manymanuals-pt.com
Comments to this Manuals